
Nineteen years ago, I started my career as a property stylist. As an art academy dropout in interior architecture, I never lost the feeling that I wanted to do 'something with interiors'. At 34, I decided to quit my job (hello quarter-life crisis) because I saw a future in property presentation. A profession that could not only pay the bills but also seemed to give me an entry into the interior design world.
Well, that last part never really happened. Yes, I designed interiors and created bathroom and kitchen layouts, but I soon discovered that long projects weren't my thing. Instead, I discovered photography.
Even before the financial crisis hit the housing market like a bomb, I noticed that estate agents who did want to work with a stylist often took their photos themselves to save costs.
Pfff… I staged beautiful interiors ready to sell, and then the agent would arrive with a point-and-shoot camera and ruin the entire look. On Funda, it still looked terrible. I knew I could do better myself. With the little knowledge I had from the few classes I took at art school in the analogue era and the help of Guillaume, who had just started at Photography School, I took my first steps in photography.
My photos were terrible, but still better than those of the estate agents. However: better was not good enough. There were no courses in interior photography in the Netherlands yet, so it took me a lot of trial and error before I was reasonably satisfied with my work. It then took years before I dared to call myself a photographer. But I am. A good property stylist and interior photographer.
First, a side note: in photography, there are no rules, only guidelines you can follow until you discover your own style. I love bright and airy images with not too much saturation. If you follow my tips, you will get a good start in interior photography.
I first published these tips in 2017, and it has been my most-read post ever since. I've now updated it with new insights, because I never stop learning.
So turn off all the lights. I repeat: OFF. Lights cause ugly shadows and colour casts. We humans are very good at seeing the yellow light from incandescent bulbs or the pale green-blue from LED and fluorescent lights as 'white'. Unfortunately, a camera doesn't have a brain that corrects colours like we do.
A customer recently asked me why I didn't want to turn on the lights. It was a dark, rainy day and she was afraid the photos would look the same. I showed her a photo with and without lights on the back of my camera. She immediately understood my choice.
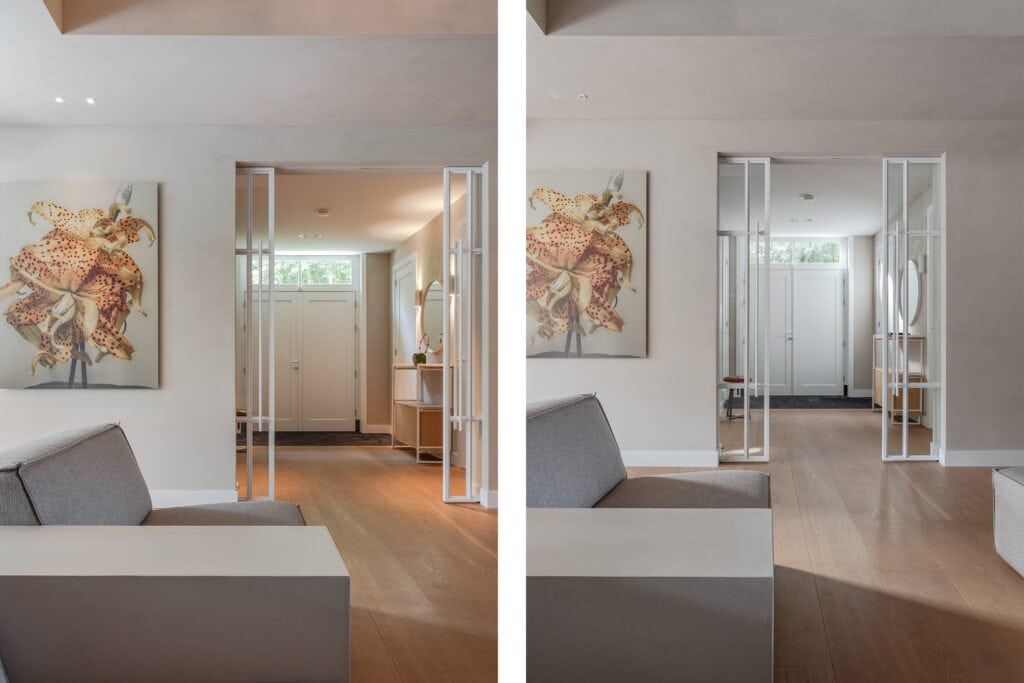
Quite a difference, right? Of course, there are situations where daylight never comes in, such as many bathrooms and basements, but as soon as there is even a sliver of daylight, I use it. Oh, flash is a big no-no for me. Light needs to come from natural directions, and flash only disrupts that.
Indoors, the light is almost never good enough to shoot handheld. A tripod is therefore indispensable. I usually set my aperture between F/9 and F/11 and keep my ISO as low as possible (preferably ISO 100) for the sharpest image. With the camera on a tripod, shutter speed is no longer a problem. Invest in a sturdy tripod with spirit levels and a three-way head or, even better, a geared head . That will last you for years.
Ensure vertical lines are truly vertical when photographing from an angle and keep horizontal lines straight in one-point perspective. Our brains know that doors and walls stand upright, even when we see them at an angle. However, the camera captures what actually happens in front of the lens. With that tripod I just mentioned, it becomes easier to keep your lines straight. And what is still crooked, you can correct in Photoshop of Lightroom .
If you are taking a series of photos of one interior, keep the camera at the same height. This ensures a calm and coherent image of the space. If you take each photo at a different height, it will feel to the viewer as if they are jumping through the space. I personally keep the camera lower than chest height, around navel height, just above the countertop. This way, the camera is nicely positioned between floor and ceiling, allowing you to look over tables and worktops, as it were. I only consciously go higher or lower for detail shots.
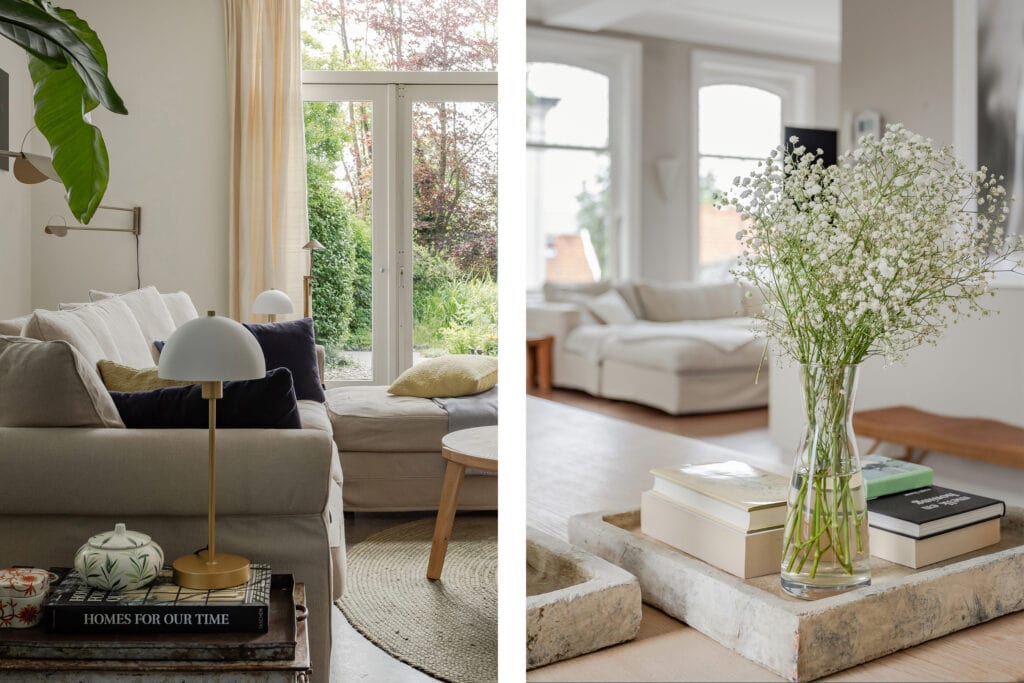
For exterior photos, I prefer sun, a blue sky, and a few nice clouds. Every house looks better when the sun is shining. It works differently indoors. Sunlight creates a large contrast between light and dark, especially if the sun shines directly through the windows. For interior photos, I therefore prefer to work on a cloudy day. The clouds act as a huge softbox and create soft shadows. Unfortunately, you cannot choose the weather and often have to make do with what you have. In winter, that is extra difficult because the sun is so low that it can shine directly into your lens, even indoors.
The best interior photos are always styled. Without styling, you can't really photograph. That's why I pay a lot of attention to photo styling in my training courses. In any case, start by removing clutter: cables, mail, newspapers, and anything that was never bought to be looked at. Don't be afraid to move or temporarily remove accessories and furniture if it improves the composition. Depending on the purpose, you can in Photoshop also remove things like light switches and sockets. Except in real estate photography. Then you have to show how it really is, including the thermostat and switches.
The trickiest thing about interior photography, besides light, is the lack of space. Don't be afraid to move furniture if it's in the way of a good photo. Or photograph the room from the hallway, just at the point where you no longer see the door frames in your viewfinder. Keep in mind that most viewfinders only show about 96 percent of the final image. Check this in post-processing and crop off edges of door frames or window frames if they suddenly appear in the picture.
A wide-angle lens is essential for interior photography. Many photographers tend to take that very literally. I rarely shoot wider than 24 mm full-frame (14 mm on a crop-sensor camera). You will not be able to get everything into one frame, but you will avoid distortion and stretched furniture. It is better to take an extra photo from another angle to show everything.
Of course, you want to show what a whole room looks like, but don't forget to get closer too. With these kinds of images, you capture the atmosphere of an interior. Adjust your aperture accordingly. Open your lens as wide as possible so that only your subject is in focus. A close-up of a vase, for example, becomes much more exciting with a soft, blurred background. Don't forget to reset your aperture afterwards for your overview shots.
Set your camera to RAW. RAW files contain all the information you capture. A JPEG is compressed and 'finished' in the camera. For RAW you need the Camera Raw -module in Adobe Photoshop of Lightroom necessary, but you can retrieve much more detail from over- or underexposed areas with hardly any loss of quality. That is indispensable in interior photography. Moreover, you can adjust the white balance much more accurately.
Editing your photos is essential to get the best result. In Photoshop can you truly create magic. Below you see the unedited RAW file next to the final result. Yes, the final photo comes from the exact same frame. I use this example in my interior photography classes to show how to make something usable out of a seemingly failed photo when you switch from shooting in JPEG to shooting in RAW.
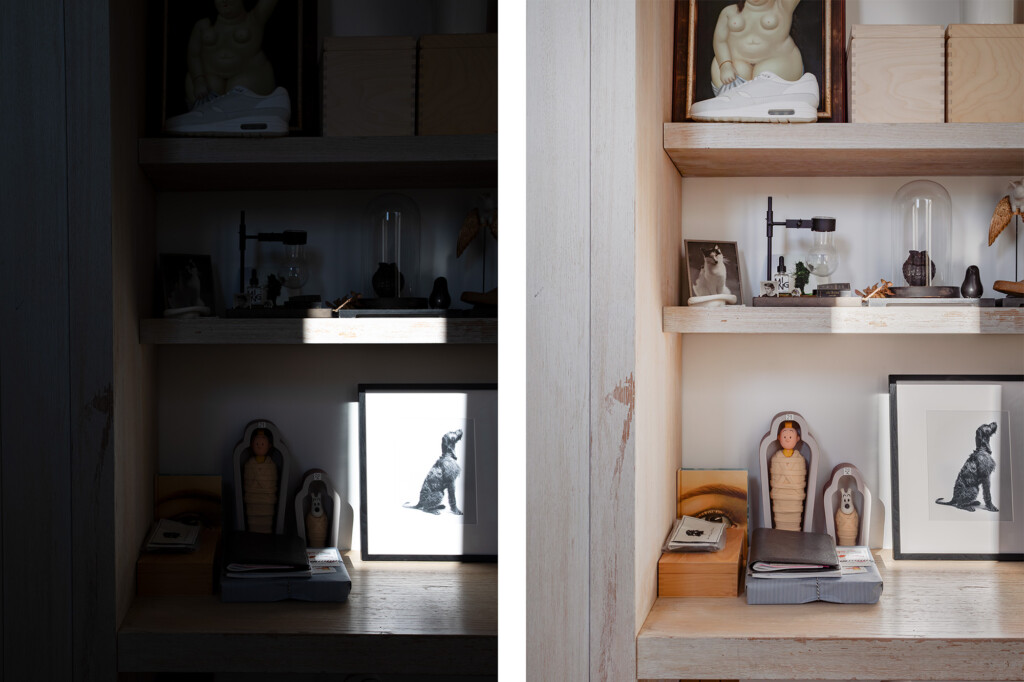
I deliberately took this photo dark, as I often do with interior photos. If I hadn't underexposed the photo, the frame with the dog would have been completely overexposed.
There is so much more to tell about interior photography. I have been sharing my knowledge for sixteen years in my Courses and I am still learning every day. The lessons from sixteen years ago are no longer like the techniques I teach my students now. Photography, and especially the post-processing that gives my photos my own signature, remains a challenge in which there is always something new to discover.
Suppose you are wondering what happened to my career as a home stager. I use that knowledge every single day to stage every interior that ends up in front of my lens. Not by completely redoing or redesigning interiors, but by making small changes and creatively using what is already there. By combining interior photography with my work, I bring the best of both worlds.
A number of tips on this page contain affiliate links. This means that we receive a small percentage of the purchase price if you order something via such a link, while you do not pay anything extra for it. We only recommend products and services that we fully stand behind and find worthwhile to share with you. We spend a lot of time on this blog to create content that is truly useful to you. Thanks to the income from affiliate links, we can continue to do so without charging you any costs. If you prefer not to, you can of course always look up the products yourself via a search engine.